Mazda MX-5 Miata banner
81 - 100 of 134 Posts
Discussion starter · #81 ·
Initial post updated with full spec and links to most parts used so far. Hope it helps people wanting anything I've used!
 
Discussion starter · #82 ·
Long time, no update, but here we go.

Been cracking on with welding practise, nowhere near as much as I should be, but it's a start. Mixed results so far, but just going to stick at it.

Got to Japfest Silverstone last weekend, really good fun, and the Combustion Punks lot are all a good laugh. Clearance was a slight issue in the long grass:

28120252078_fdf6ab4a56_c.jpgP1000396 by Chris Oldham, on Flickr

As for the car itself, big update of sorts. I've put a deposit on a Speeduino PNP ECU. I've been looking at these for a while, been chatting with James Brandon, the UK distributor. He's been really helpful and I've got a good idea of what needs to be done to get it all in and working. Here's the ECU:

41382852794_61eeb37fc8_c.jpgSpeeduino by Chris Oldham, on Flickr

Planning to pay for it when I get paid, and get it all in and running by the end of the month.

To go along with this I'm getting an IAT sensor, and a BMW VTPS with a 3D printed bracket. Means that I can ditch my AFM which I'm pleased about. Probably also need a wideband ideally, but I need to sell some bits to afford it all. If anyone wants my old 14" 7 spokes with some used NS2Rs let me know!

Anyway, exciting times!
 
OOO, why that ecu and not a ME221 or MS?
 
OOO, why that ecu and not a ME221 or MS?
Quality price point mate. At £250 fully assembled you could say it's too good to be true, but it's a really cool open-source project, still being developed and updated regularly. Not as much of a polished product as an ME or MS, but have a look through the forums, lots of builds going on with them on a wide range of cars: https://speeduino.com/forum/

Comes with a 1bar map sensor as standard, with add-ons for a 4bar sensor, and integrated bluetooth.

I've been following the project for a while and to be honest while there have been issues people have encountered, they seem to release patches and updates very regularly. I've seen a few turbo MX-5s running them. It runs TunerStudio so most tuners should have no issue working with it.
MS (Mega JOLT before) started as an 'open-source' project :thumb-up:

must confess that I'm looking at speedurino as well as ME221 but thats just for the Plug&play aspect (I have 2 diferent MBE ecus in the shed, they would need seperate engine-specific looms :yes: )

as to your weld practace, keep at it :thumb-up:

I'm sorta an ex professional welder with the attitude that I was being paid to practace :whistle:

:yes:

Rich.
 
Discussion starter · #86 ·
OOO, why that ecu and not a ME221 or MS?
Quality price point mate. At £250 fully assembled you could say it's too good to be true, but it's a really cool open-source project, still being developed and updated regularly. Not as much of a polished product as an ME or MS, but have a look through the forums, lots of builds going on with them on a wide range of cars: https://speeduino.com/forum/

Comes with a 1bar map sensor as standard, with add-ons for a 4bar sensor, and integrated bluetooth.

I've been following the project for a while and to be honest while there have been issues people have encountered, they seem to release patches and updates very regularly. I've seen a few turbo MX-5s running them. It runs TunerStudio so most tuners should have no issue working with it.
MS (Mega JOLT before) started as an 'open-source' project :thumb-up:

must confess that I'm looking at speedurino as well as ME221 but thats just for the Plug&play aspect (I have 2 diferent MBE ecus in the shed, they would need seperate engine-specific looms :yes: )

as to your weld practace, keep at it :thumb-up:

I'm sorta an ex professional welder with the attitude that I was being paid to practace :whistle:

:yes:

Rich.
I honestly think it's got a lot of potential from what I've seen. Really hope more people get on board with it, definitely worth a try for £250.

I am going to keep it up, just need to buy some slightly thicker metal, the sheet I bought to practise with is actually thinner than the sills on the 5, so it's not ideal for initial practise really.
 
I'm going to attempt to tackle my own sills too, would be interested to see some pictures of yours as you do it
 
Discussion starter · #88 ·
I'm going to attempt to tackle my own sills too, would be interested to see some pictures of yours as you do it
I will certainly update it mate, still a way off of being able to weld properly, but I'll get there. Will be good to turn this into an actual build thread with some decent work being done.
 
Yo, it's Speeduino time!

Edit: this turned into some mega long post, hope it helps someone. It took like two hours to write this out haha :mellow:

It has not been a relaxing Bank Holiday! Wiring, drilling, ripping stuff out, putting stuff in, I even soldered and crimped some wires successfully!

So as I said previously I put a deposit on a Speeduino until I had the money. James Brandon, the UK guy doing the Speeduino stuff has been a tremendous help, answered dozens of my noob questions, and always got back to me with a decent answer that helped out. Very much recommend him!

So the purchases:

Speeduino MX-5 plug-n-play

BMW E36 Variable TPS (Löwe Automotive)

3D printed TPS adapter bracket

Bosch IAT sensor

Innovate MTX-L Plus wideband with Bosch 4.9 sensor.

6mm vacuum hose

Tools needed:

Socket set

Spanners (ratchet type preferable)

Phillips and flat head screwdrivers

Soldering iron

Wire (don't know the gauge, just eyeballed it and looked identical to wideband wiring size so just used that).

Heat shrink

A rubber mallet (maybe)

Crimp connectors

Wire cutter/stripper (giggidy)/crimping tool

Dremel (optional)

DISCLAIMER: this isn't a how-to guide, I'm not a pro in any way at all at this, and I've almost certainly done something wrong. Don't copy anything I do here without doing your own research. If you blow your engine up or set your car on fire because "Bilbo said..." then you're a retard :ghey:

So it started out pretty well, unplugged the battery, ECU cover came off, wasn't too rusty down there so not seen much water in it's time, good start. Got the ECU in, literally just plugs into the stock connectors.

IAT Sensor

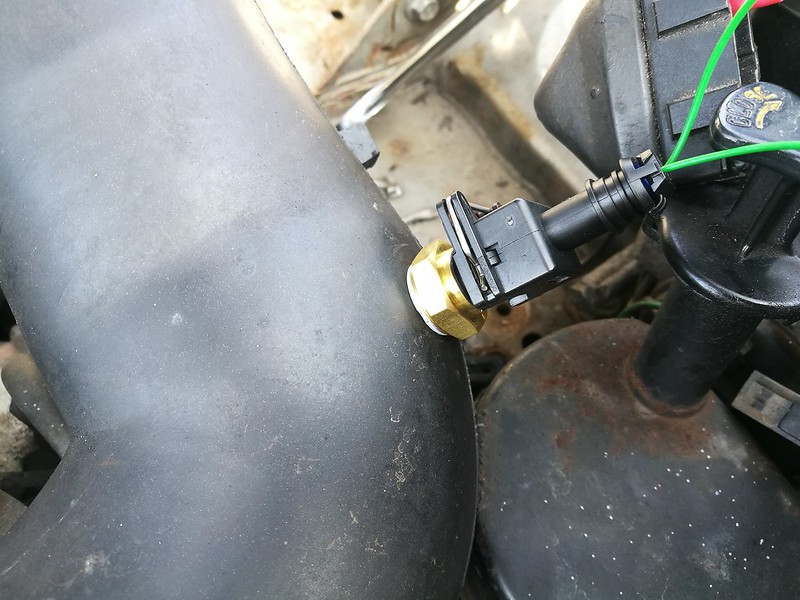
IAT sensor was pretty simple really. It's a Bosch type, with an M12x1.5 thread. Tapped a hole into the crossover tube and threaded it in:

28522218438_e504fce646_c.jpgIMG_20180526_101702 by Chris Oldham, on Flickr

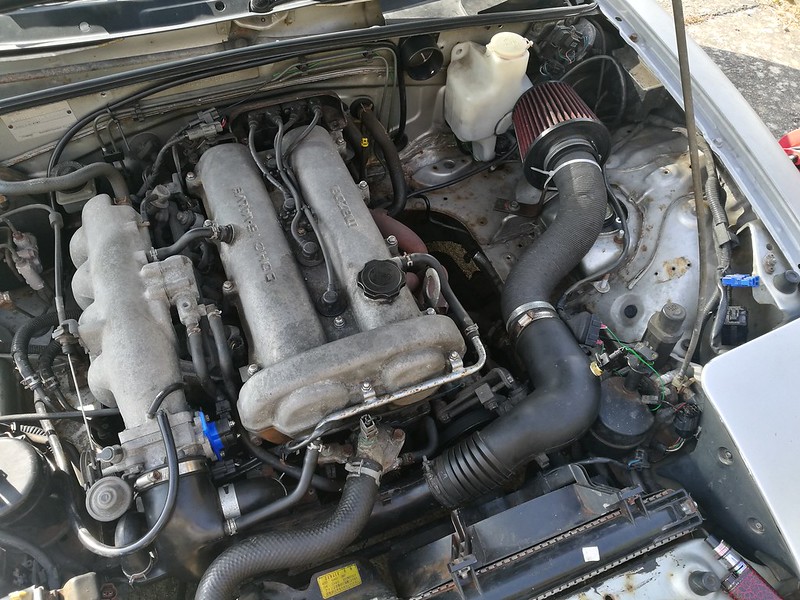
I did some research and most people suggested fitting the IAT over by the throttle body, however I assume this was due to most installs being on a boosted setup, hence you want a reading after the intercooler. As I'm staying n/a for now I just tapped it over the other side. Less wires in the bay to get caught on stuff, and it seems to be working just fine.

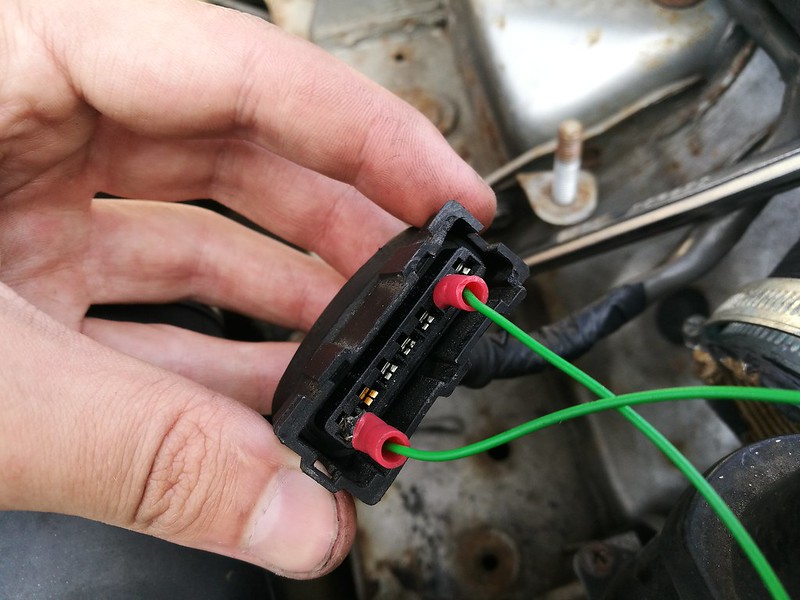
As the AFM was no longer needed I removed it, and you simply bridge pins 1 and 6 on the AFM connector plug with your IAT wires (not polarity sensitive apparently):

41671922564_3c32d1a9a7_c.jpgIMG_20180526_101723 by Chris Oldham, on Flickr

Easy enough, though the spade connector size is very small! My dad actually used a Dremel and filed two down for me so they would fit.

Variable TPS

The 1.6 mk1s came with a switched TPS, so either on or off essentially (except the auto which came with a variable TPS). The problem with this is the ECU can't see how much throttle is being applied, apparently it can cause some issues with acceleration enrichment. So the E36 VTPS is the obvious choice. It has the exact D-shape slot needed to fit right over the throttle pin thing (technical term, I don't know what it's called). This style TPS seems to have been the go to for years now so it was a no-brainer really. Though many people have suggested that a genuine one is better than some of the aftermarket alternatives.

It's super tight (giggidy) around the TPS, so you need to pop the crossover tube off and undo the throttle body bolts to get the standard TPS off. You can't get it off without doing this as the throttle pin thing is just too long. So off with the throttle body, undo the 6mm head bolts holding the TPS on, and take it off.

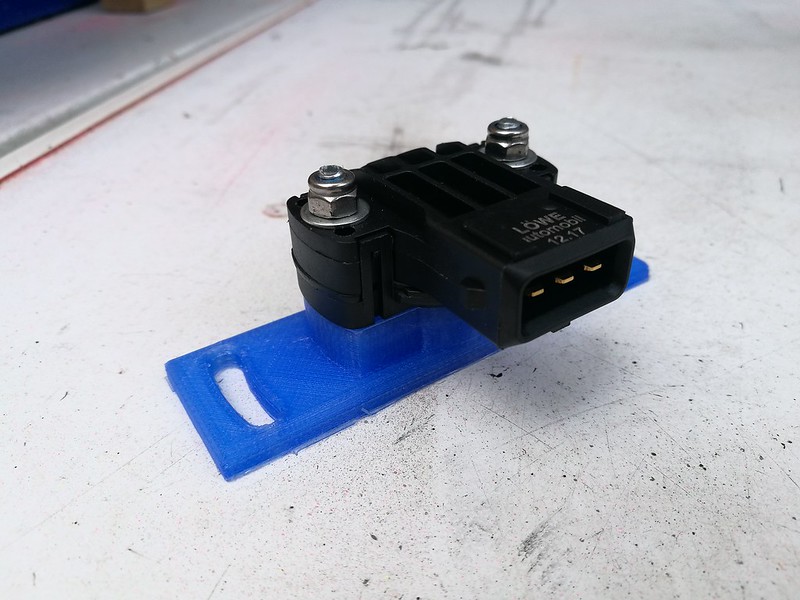
I mounted the new TPS to the 3D printed bracket:

42345997962_f28e335533_c.jpgIMG_20180525_135644 by Chris Oldham, on Flickr

Again pretty easy. Two M4x30mm bolts and two M4 nylock nuts to hold it on. On the back of the bracket there is a sunk in section which allows the bolt heads to sit without fouling the mounting face of the bracket. Really easy.

Wiring wise I spent hours, literally hours reading up on how to wire it. I read conflicting information in a few places and eventually went with this post by WooDooUK from 2013: http://www.mx5nutz.com/forum/index.php?showtopic=1311&p=1393939

Essentially all 3 wires are moved.

Red pin 3 to pin1

Green pin 1 to pin2

black from pin 2 to pin 3

I needed to get it done and he said this worked on Megasquirt, so I just gave it a go. It works, TPS calibrated perfectly first try, and it can't be reverse signal like Megasquirt yet as that hasn't been implemented in Speeduino firmware, so has to be wired spot on.

As for fitting, it has to be fitted with the plug facing backwards, as this is the only way the E36 TPS can slot on to the throttle pin. Don't force it ffs, you'll damage it. Line it up, slot it on, it sits like this:

41671954374_8b14730f5d_c.jpgIMG_20180526_101658_1 by Chris Oldham, on Flickr

Fiddly, but it works. You can use the standard bolts to mount the bracket to the throttle body, they're just about long enough to get enough threads on. I loctited one of them just to be sure once I knew the TPS was working. I bolted the throttle body back up and re-connected the crossover tube. Other than the bracket being blue it looks pretty OEM imo.

TPS calibration is easy in TunerStudio, just select "Calibrate TPS". Ignition on, throttle off, on "Closed Throttle" option click "Get current". Then "Full Throttle" option, foot flat to floor, click "get current". Done.

Wideband

For me this was the big one. Quite an involved job that required various interior bits to be removed. I've heard conflicting reviews about Innovate widebands, but it seemed a good product to me, and it is in and working well from what I can tell.

It's actually quite simple. Extend the four wires that come out of the gauge to the required lengths, mine are a bit long to be honest.

Red is 12v live

Black is ground

White is optional dimmer for when lights are turned on, so dims at night.

Yellow is the analog output to the ECU.

I wired the red to my cigarette lighter live, not 100% sure this is the best solution, but it works.

I chose not to use the dimmer, so this is just grounded with the black. I grounded both of these with a ring terminal, into the engine bay, right in the back passenger side corner below the window wiper motor, same ground as the white block of grounds there. Easy to find, works fine.

Yellow is simple enough, the standard single wire narrowband plug runs up past the coilpack from the o2 sensor. Unplug the connector, cut the o2 sensor off and leave a bit of wire, then solder the yellow onto there. Plug the connector back in, this goes straight to the correct pin on the Speeduino.

Didn't get any photos of all this as I was stressing about doing it right and forgot.

Undo your standard o2 sensor, you'll probably need to take your manifold heatshield off to do so (snap, snap, snap go the heatshield bolts). 21mm spanner IIRC for the o2 sensor. This is where the mallet came in, that thing was in tight! Don't plug your wideband o2 sensor in yet as it needs calibrating in fresh air first (Innovate does, don't think AEM ones do?), but I can confirm it fits the standard o2 sensor bung hole (something something Cornholio) just fine.

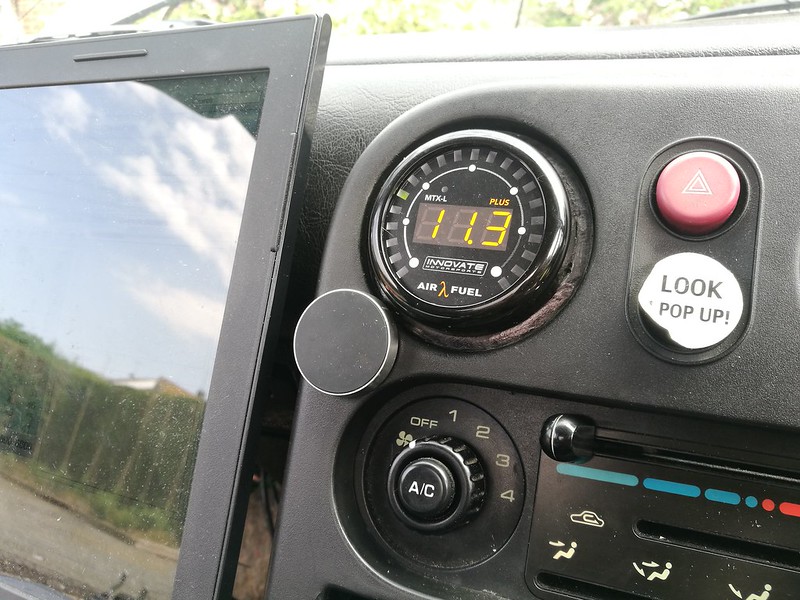
I used one of the middle air vents for the gauge. Drilled and enlarged a hole in vent tube:

41492975755_66dd04334f_c.jpgIMG_20180526_114916 by Chris Oldham, on Flickr

You need to take center console and tombstone out to really get to this properly. Then I fed the wires through and mounted the gauge. It fits pretty well but needs a bit of work really:

27525085467_c44eb0b730_c.jpgIMG_20180526_150155 by Chris Oldham, on Flickr

Get it all plugged in, leave the o2 sensor unplugged when you switch ignition on, let it show an error code. Then ignition off, plug o2 sensor in, let it display "htr" and wait for the 22.4 reading. That's it, calibrated, you can fit the o2 sensor into the exhaust.

Other

Fit the 5mm or 6mm vacuum line to the specified blank on the inlet manifold as per the Speeduino manual (see section below for link).

Fit an air filter. I've just put together an open cone for now that I had from my old mk2. It's not ideal and heatsoak is a consideration, but I'll be buying one of those cheap carbon enclosed intakes soon and re-connecting my Randall Cowl setup soon:

28522125738_b9fa34bbac_c.jpgIMG_20180526_163703 by Chris Oldham, on Flickr

Speeduino

I'm not going to go into the Speeduino setup too much, the manual is here and it's very concise: https://speeduino.com/Speeduino_mx5.pdf

This is a good resource to if you need more info: https://speeduino.com/forum/

NOTE: In the Speeduino manual it does say to select "Other/Browse" when trying to set up your TunerStudio project. Don't do this, I spoke to James about it and he said that bit is outdated, just click "Detect". TunerStudio will likely download what you need, and just use that. Currently it is called "Speeduino 2018.4" (correct as of 28/05/2018), I believe there is an update every month so this will likely change to reflect that. It also may come up as "Unknown", this is also fine from my experience. As long as it finds the Arduino board when you run "Detect". But yeah, don't spend two hours like me looking in the "Other/Browse" section. You won't find it.

Also, all of the compiling firmware stuff in the manual isn't needed if you buy the full ready to go pnp unit, it's already on there with a 1.6 base map.

TunerStudio

I'm not going to go into too much detail about TunerStudio. It's an established product, and your answer is likely online somewhere already, written by someone far more knowledgeable than myself!

What I will say is if you've watched any MegaSquirt based TunerStudio videos, Speeduino doesn't quite have all the same options and settings available. It's still fairly new and some stuff doesn't seem to be available as of yet. Off the top of my head stuff like spark cut or fuel cut rev limits and launch control settings aren't available yet, it seems to just run spark and fuel cut for both right now.

Read the Speeduino manual for calibration advice, it's easy, I sorted it easily and I'd never used TunerStudio before. RTFM!

Running the car

It started on the basemap second try. Yay, 10 points to Griffindor. It runs, but it's a basic base map, it runs rich, which is safe I suppose, but not a long term solution.

I had massive issues with hard throttle. Basically it's like it died for a second when you plant your foot. Made pulling away difficult, and it was hard work to drive on faster roads. Anyway, turns out it was the TPSdot setting in Acceleration Enrichment. It was set to 30, I changed mine to 135 and it's so much better. Acceleration Enrichment isn't perfect but I've got the "Accel Time" at the default 700ms right now, so that is probably what's causing the minor stutter I have remaining, will be testing lower values tomorrow. I've seen some people say 200-300 is a better setting. Also you may want to turn on the "Deceleration fuel cut off" in the same menu, it's deactivated on the basemap and it's meant to help with fuel saving.

As for the map itself, it seems ok, runs rich, bit boggy in places, but doesn't seem to run lean much/at all. I don't have much of an idea about the tables yet, that's going to take some more learning.

MOST IMPORTANTLY OF ALL: Launch control works! So childish and stupid on a standard power car with a dodgy clutch, but just brapping at 3k rpm on the driveway with my dad was hilarious.

Final recommendations

Buy the TunerStudio and MegaLogViewer licences. Honestly it's worth it for the AutoTune feature in TunerStudio, and the logging capabilities in MegaLogViewer. Plus you can analyse and get a suggested table edit from a log of infinite length with the MLV licence, it's well worth it! It costs $59 for TS and $29 for MLV, with more expensive options if you want/need even more features. But yeah just do it (Nike/Shia LaBeouf).

Do your research, read the manual:

https://speeduino.com/Speeduino_mx5.pdf

https://speeduino.com/Speeduino_mx5.pdf

https://speeduino.com/Speeduino_mx5.pdf

https://speeduino.com/Speeduino_mx5.pdf

https://speeduino.com/Speeduino_mx5.pdf

Google everything, read the threads, ask questions, watch videos.

Watch this guy: https://www.youtube.com/channel/UCY7ZNcVB9S2T5Go9Yjks3Gg really good in-depth understandable videos, and he has some on TunerStudio, wiring a wideband, and loads of other related stuff. It helped me so much to watch someone do it first.

I'm literally only just scratching the surface on this standalone stuff, but I really like it, it's great having control over all the little details, and I've learnt so much by just throwing myself in at the deep end. Speeduino is a quality project, and the product is great if you're on a budget, and James Brandon has been invaluable during the whole process.

I've almost certainly missed something, so yeah just ask about whatever you can't see, I'm no pro but I'll do my best to answer.

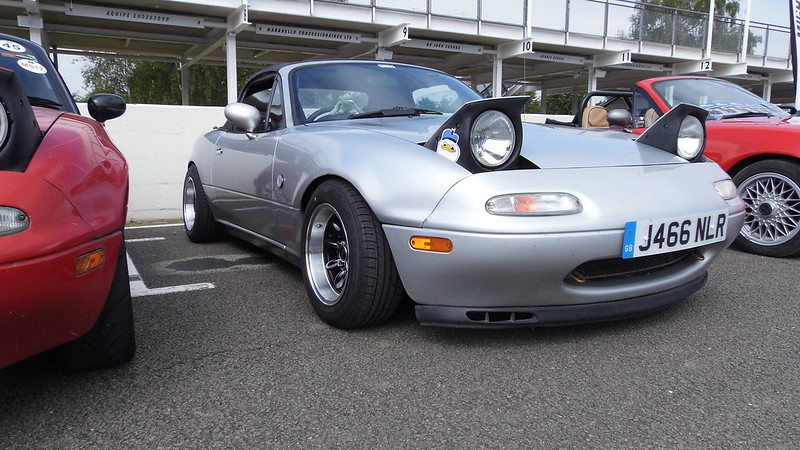
Oh yeah I also went to RetroRides Weekender at Goodwood last weekend, here's the car on the Mighty5s stand, which we got right on the start grid of the track!

42249825841_af925d093b_c.jpgP1000399 by Chris Oldham, on Flickr

And sexy Zoom Elan shot:

41520431974_41b20f5b33_c.jpgP1000542 by Chris Oldham, on Flickr

Full 283 photo album here if anyone wants to browse some of the insane cars that were there: https://flic.kr/s/aHskynbUqv

I'm going to bed, this took too long to write.
 
Discussion starter · #91 ·
Hadn't heard of this., Very interesting. Thanks for the write up.
No worries, thought I'd put it all in one place to help people out.

It is a cool little ECU. Hasn't got the full functionality of the other big names yet, but I'm slowly getting it to run better. Obviously there's only so much AutoTune and MegaLogViewer can do to help, but it's certainly on it's way to running nicely.
 
Discussion starter · #92 ·
So I did a few more hours of driving today, and further improvements have been made.

In terms of Acceleration Enrichment I have reduced the Accel Time field from 700ms to 300ms currently. This has almost eradicated the hesitation issue I mentioned yesterday. Kind of a rotary/2 stroke sound to the exhaust for a split second, then carries on up the rev range quite well.

The issue before I made this change can be seen here:


Notice the slight hesitation as I hit 2nd, then the more pronounced hesitation as I hit 3rd. Almost gone now, but still happens a tiny bit.

Current Acceleration Enrichment settings (graph values are basemap figures, I have made no changes):

40601582790_8834c94b8d_z.jpgAccel enrichment settings 28-05-18 by Chris Oldham, on Flickr

You'll also notice I've now activated Deceleration Fuel Cut. I brimmed the tank, did 79.7kms, then brimmed again. Not really long enough I know, only put in 8.78 litres, so works out at 25mpg after conversion. Not bad considering it runs rich and I have done numerous 0- 80 err 60 pulls :ph34r:. However I thought I'd give the Decel Fuel Cut a go. Using the basemap settings, I just changed the TPS Threshold from 1% to 5% just in case the TPS signal was noisy. I am having issues though, it's a bit jarring coming back on throttle lightly during cruise, and can be very jerky in traffic when you're stop start constantly. Anyone with experience see anything amiss? My initial impression was to put the TPS Threshold back to 1%, I will check my most recent datalog I made today but I don't think my TPS signal is noisy at all. Perhaps I don't even need this setting to be on?

I also mentioned last night that I had concerns about heatsoak due to my temporary K&N cone filter setup. Well I ran a datalog yesterday evening, it was still pretty warm out so that will play a part, but I was seeing intake temps between 32℃ and 55℃, so a little higher than I'd hope for really. Fitting an enclosed intake and re-attaching my Randall Cowl routing should see these drop though, I will update on my findings after I have fitted it.

It would be rude not to show off the Launch Control after telling you that it works, so I made a video of it. Here are the settings:

28536333288_717fc2657b.jpgLaunch control - Flame mode by Chris Oldham, on Flickr

Yes it's a low rpm, and yes the timing is very retarded (much like myself), but this isn't a feature I will be using, I just fancied a quick brap for the camera, and it is now deactivated in my map. Sorry for the sound quality, I filmed it with my proper camera and video is not it's strong suit, the mic is really crap:


It did a flame. It made me jump and I laughed like a child. Won't be using those settings if I ever decided to use it, will likely blow the welds on my intake (dangertomanifold.jpg) /s

Back to work tomorrow but will keep on doing bits and pieces when I can. Still need to secure the ECU into the car, tuck the wiring, and re-fit the ECU cover and carpets. Plenty of little jobs but I'm happy to say it has been a great success so far.
 
Really cool write up! I'm running ME221 so not too applicable to me but certainly excting for the open source community and for the future of cheap tuning.
Thanks mate. It is exciting to see this, and I just want to put it out there that it is an option to people on more of a budget, or who like a bit more of a DIY install.
 
As for fitting, it has to be fitted with the plug facing backwards, as this is the only way the E36 TPS can slot on to the throttle pin.
stupid question (as I've not looked at one :whistle: )

is the throttle-shaft / drive to the tps 'D' shaped?

if so couldnt you file a new flat 180* opposite to position the tps in a more user-friendly orientation?

sorta where I'll be looking when I (eventually) get round to sortin ecu stuff.

Rich.
 
Discussion starter · #96 ·
As for fitting, it has to be fitted with the plug facing backwards, as this is the only way the E36 TPS can slot on to the throttle pin.
stupid question (as I've not looked at one :whistle: )

is the throttle-shaft / drive to the tps 'D' shaped?

if so couldnt you file a new flat 180* opposite to position the tps in a more user-friendly orientation?

sorta where I'll be looking when I (eventually) get round to sortin ecu stuff.

Rich.
It certainly is D shaped on the mk1 1.6 manual throttle body, I can't speak for any other models however.

I'm not sure if you could do that, but it isn't really super tricky having it backwards like mine if you have the throttle body off, just push the TPS on carefully, bolt it up, and plug it in and then do the throttle body back up after.

Just don't twist the TPS D slot around, apparently they only have a limited range of movement and can break quite easily if forced.
 
Fun read. Well done getting it all going. I'm looking to purchase an ME221 next as a first step to turbo charging. Not sure I'd have the confidence/patience/skills to set it up myself, so kudos to you!

I am also a big child, so loving the launch control! ^_^
Good luck with it man, looks to have come a long way now, the ME is definitely a great choice.

Well in terms of setup, if you're doing it yourself you'll still need to sort TPS, IAT, wideband, and the like. But seriously I'm not electronically minded, my dad showed me how to solder and sorted the TPS wiring for me, but I soldered up most of the wideband stuff myself. So while time consuming, as long as you have the tools you can get it done yourself.

Literally everything I've ever worked on with my 5s I've learned from trawling forums, how-to guides, and watching Youtube videos. Without the internet I wouldn't have a clue with some stuff haha.
 
Discussion starter · #99 ·
So I decided to lower my TPS Threshold percentage in the Deceleration Fuel Cutoff menu as I mentioned before, as my TPS signal appears to be noise free 5% may have been a little high. Big thanks to Martin Y for his thoughts on this as well, made me more confident in my plan to put it back to the 1% threshold that the original basemap had when it was deactivated. Also raised the Cutoff RPM from 1,500 to 1,800.

It now transitions so much smoother than before, so much so that I forgot it was even active after a while, no more jerkiness at all during cruise or in traffic.

Here are the current settings:

40632674810_eae17ef565_z.jpgDecel Fuel Cut Off settings - 29-05-2018 by Chris Oldham, on Flickr

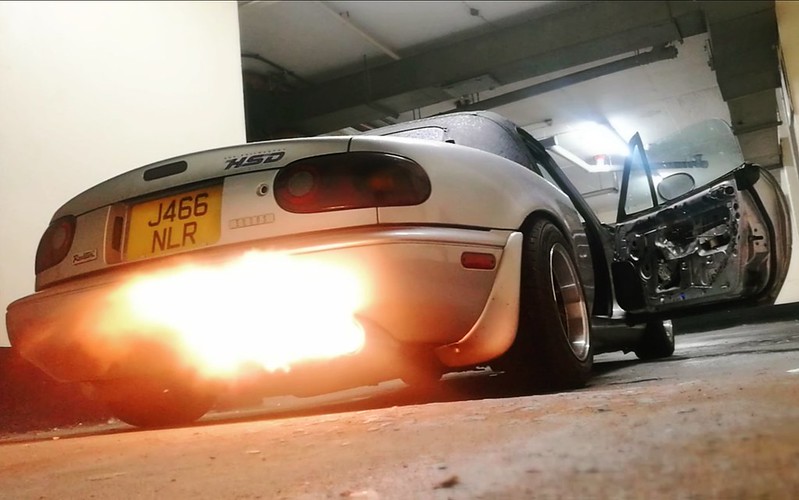
Also couldn't resist having another play with Launch Control huehuehue. Set timing to 0 degress during Soft cutoff from previous -4, and raised soft cut off to 2,750rpm from 2,500rpm. Decided to get some footage in the garage. DO NOT RECOMMEND. My ears are still not feeling right haha, massive flame and bang. Got a great still from the video though:

41717497124_024fb918a4_c.jpgSpeeduino Launch Control. Big flames by Chris Oldham, on Flickr

:drool:
 
Ok, so made a bit more progress made today. While my slight acceleration stutter is still preset I decided I really needed to do something about how rich I'm running.

We're talking 11.5-12.5 AFR at idle, so very rich, even more so when cold. Not ideal so I ran a datalog for about an hour, got all kinds of driving styles in that time. Traffic, cruising, and a fair few pulls to the redline in 1st and 2nd, maybe even 3rd.

Adjusted my target AFR table slightly as the idle AFR values were a little rich for my liking. Loaded the log on MegaLogViewer, updated the AFR table to the new one, and ran VE Analyze. It made some changes including dropping a value down drastically around 5,000 rpm (I'd noticed this one value was really high compared to the others around it, not ideal). I updated the table and downloaded into my current tune on the Speeduino.

Now idling at around 13.5-14.5, so a big improvement, and much closer to what I want to be seeing! Also doesn't stink of fuel when stopped, so will hopefully contribute to an improvement in fuel consumption. Today's brim to brim from 172kms came out at 26mpg, lots of hard driving though so not too concerned.

I then went into the AFR/O2 menu and noticed that the Wideband Algorithm was set to "No Correction", so no corrections could be made in realtime to better suit my Target AFR table, it just goes purely off of the VE table. I hadn't changed it from the basemap, which was set for Narrowband, when I changed to Wideband I forgot to change the algorithm. Now changed to "Simple", and I've given the controller a 15% +/- Authority, so it can adjust my VE table on the fly by 15% either way to closer match the target AFR table. Much much better! Coolant minimum is set to 75 degrees C, so it doesn't mess with my warm up enrichment, and "Active Below TPS" is set to 70% as I'm quite happy with the WOT AFRs I'm seeing, and don't want it to mess with those either.

The AFR does seem to dart around a little bit more than before, presumably this is due to it correcting itself constantly. Also noticed that there is a small difference in AFR reading between the gauge and the reading in TunerStudio. We're talking 0.2-0.5 AFR difference. After some research it may be a grounding issue, or the 12v live being from a different source as suggested by JoeyTalent on Mighty5s previously. Either way it's likely a simple fix which I will get around to.

Also ordered one of those cheap enclosed carbon intakes as my temporary K&N cone is heatsoak central, especially in this weather. Still seeing 55 degree temps in traffic, down to 30s when moving, but I won't be happy until I've consistently lowered it. Will update as and when I do.

Driving wise it's so much better than a few days ago. Despite the slight hesitation it's pulling well now, and the top end is much smoother since I moved my hard limit up to the standard 7,250rpm, and the soft limit up to 6,900rpm, as well as advancing soft limit timing slightly. Much smoother to the redline now.

Massive text post, so here's a photo of the car, freshly jetwashed, but not properly clean!

42493133262_a9efa75ab6_c.jpgEunos 13" wheels by Chris Oldham, on Flickr
 
81 - 100 of 134 Posts