Mazda MX-5 Miata banner

Meisterr Zeta-S Coilovers (Pics, Setting Springs Pre-Load And Ride Height)

150K views 435 replies 155 participants last post by  TheArchitect  
#1 · (Edited by Moderator)
I had a few members who asked me for information on the Zeta-S Coilovers and also how to setup the springs pre-preload before installation.
So I thought it would be a good idea to take a few picture to help out as it is much easier doing this before the actual installation.

MeisterR Zeta-S Coilovers for MX5

MX5.jpg


The Zeta-S Coilovers comes fully assembled with top mount out of the box, so there are no need to build your suspension.
The rear extended top mount is now standard on all MeisterR Zeta-S coilovers for the MX5

Box.JPG


The total weight of the coilovers is 12.55kg including the top mount.

Total.JPG


The Front Coilovers assembly is 3.45kg, the rear coilovers assembly is 2.80kg

FrontRear.jpg


Setting Spring Pre-Load:

The Coilovers are assembled from the Factory with slight amount of springs pre-load.
The pre-load are now pre-set from factory for easy installation.

Out1.JPG


Ride Height Adjustment:

Once the Springs Preload been set, there is no need to adjust them again unless you want to change the springs tension.
To adjust the ride height, use the lower bracket only.

Bottom.JPG


Revised Out Of Box Specification

We have revised the assembly for easier installation.
The default setting out of the box has now been preset for a more commonly used ride height.
The current spec out of the box will give a ride height of about 310mm in front and 320mm in the rear.

Once installed on the car, the long as you use only the lower bracket to adjust the ride height, then you cannot go too far wrong.

Hope that helps and give a little more idea for owners who are trying to setup their coilovers.
And as usual, if anyone have any questions, please feel free to PM me at any time. :thumb-up:
 
#4 ·
Brilliant write up Jerrick!

Also good to see I installed mine properly with regards to preload
Image


Adam
 
#7 ·
That is correct.

When you change the spring tension (say if you want to have 10mm of preload), the ride height will change.

All you have to do is adjust the ride height again using the lower bracket to even the ride height out again.
Image
 
#8 ·
Can anyone give examples of coilover length to ride height? Would speed up initial setup when fitting (my drive is rather less than level)
 
#13 ·
will measure mine up tomorrow, mine is set to -10/-15mm over stock, but will post coilover length for my rideheight
 
#16 ·
This will give a rough ride height of 310mm in front and 320mm in the rear.
So how much higher can I run these? The roads round me have plenty of speed bumps and I live on an unadopted road.
[/quote]

Having a quick look at the engineering drawing, you can do another 10mm - 20mm higher than that.
After that, you will run out of the height adjustment using the lower bracket...

If you still want to go higher, then you can use the springs pre-load to do so at that point.
310mm front and 320mm rear isn't really that low... I doubt anyone really wanted to go higher as it will start looking very 4x4 ish.
 
#17 ·
This will give a rough ride height of 310mm in front and 320mm in the rear.
So how much higher can I run these? The roads round me have plenty of speed bumps and I live on an unadopted road.
[/quote]

Having a quick look at the engineering drawing, you can do another 10mm - 20mm higher than that.
After that, you will run out of the height adjustment using the lower bracket...

If you still want to go higher, then you can use the springs pre-load to do so at that point.
310mm front and 320mm rear isn't really that low... I doubt anyone really wanted to go higher as it will start looking very 4x4 ish.
[/quote]

Fitted mine as per Jerrick's instructions.....ride height just right. Sits around 25-30 mm lower front and rear. First impressions are very good. Going to let things settle then off for 4 wheel alignment. ill keep all posted.
 
#18 ·
Hi

Fitted my suspension the other week, went in slot easier than the original stuff came out. Quality looks fantastic, hope to give them there first test in a couple of weeks time at an airfield day to hopefully get them fully settled before a full geo down at WIM.

couple of quick questions, what damping settings are people using? My car is a track only car, so no on road driving so am wondering what people are using so I can have a bit of a starting point to work from.

Also what ride height would people suggest to have an optimum track height, ie level wishbones, think the settings above are a little low, looks good though, car is not at home ATM so cannot measure, did when they first went on but didn't write it down, pretty sure it was as above though 310 and 320, thinking it should go to 320 front 325-330 rear, sound about right?

Also what is the thread size on the front abs sensor wire bracket? My original bolts were different sizes, one side is to big, and the other is seized so needs drilling out, so not even sure if that is the corret size.

Car is a 1.8 mk2 btw.

Thanks

Andy
 
#19 · (Edited by Moderator)
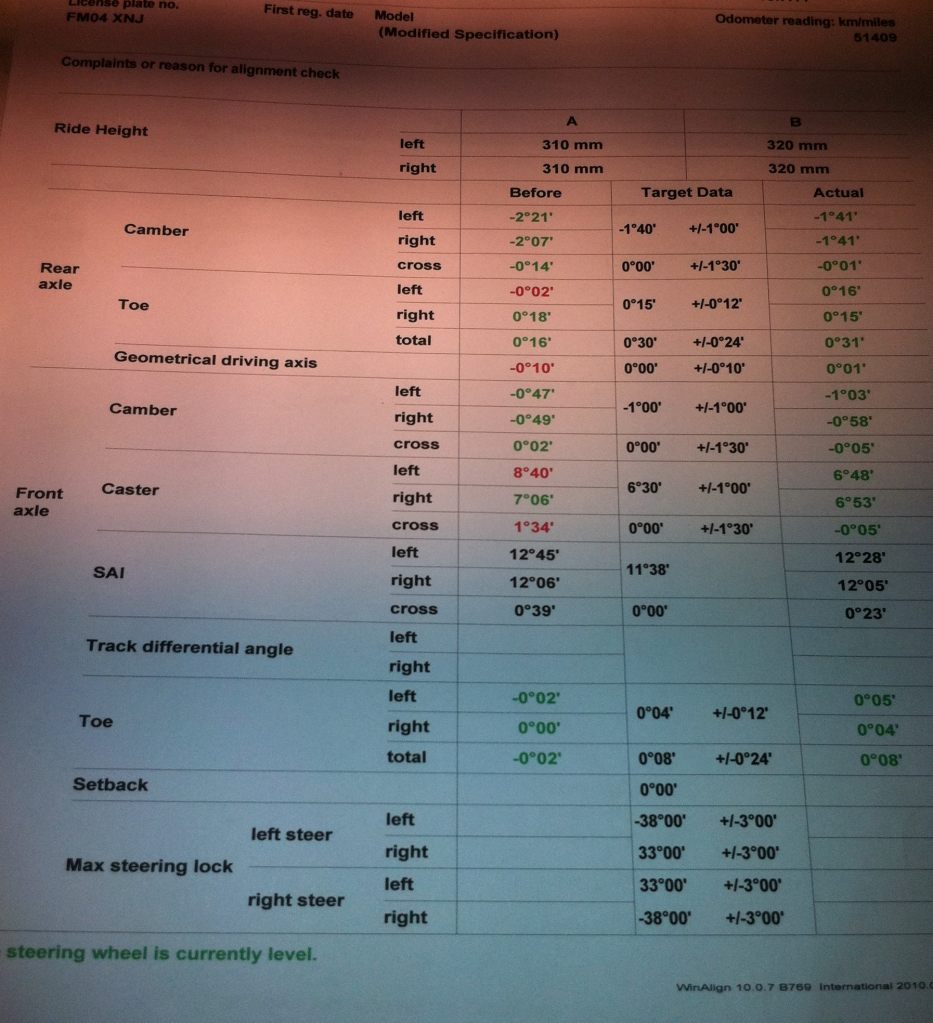
Andy here's my geometry from WIM

Will figure out what the dampening was set for when I was on the track and post that up

Image
 
#20 ·
Excuse me for being Fick (yes, that's with a capital F!)
But is the ride height easily adjustable whilst on the car? Or do I need to unbolt the bottom of the shock?
I'll be fitting mine in this week, so would like to know asap please!
 
#21 ·
just need to jack the car up and take the wheels off mate.

you just use the provided c spanners to wind the shock up or down

Image
 
#23 · (Edited by Moderator)
Yes, loosen the very bottom collar and wind it up as much as you want to drop the overall height.
Then use the very top collar to turn the shock down (the locking collar under it will stop it from moving down the thread and force the shock body to turn) until the bottom collar bottoms out, then nip it up.
If you need to raise the height, same procedure, but use the locking collar to turn the shock upwards, as before the top collar will stop it from turning
Job done
 
#25 ·
#26 ·
Thanks for all the tips!
JayDee - after your issues with drop links, i've looked into it on mx5 parts. it seems that you can just cut the bolt off, and reuse the drop link. can someone confirm what size bolt is used? as they look like standard nut & bolt to me. No point wasting ?15 in mx5parts if i can use a normal nut & bolt
 
#27 ·
4 new drop links were bout ?26 quid mate, IMO picking up new ones is a no brainer when dropping over 500 quid on new suspension
Image
 
#28 · (Edited by Moderator)
4 new drop links were bout ÂŁ26 quid mate, IMO picking up new ones is a no brainer when dropping over 500 quid on new suspension
Image
from where??????
mx5 parts was about ÂŁ25 each!!!!!!!!!!!!
eurocarparts are ÂŁ12 each with their 25% off

i plan on polybushing everything soon, so i dont want to waste ÂŁ50 on links with new bushes, only for me to rip the bushes out over winter. i'd get them if they were ÂŁ25 though
 
#29 ·
Just a note that the new suspension will come assemble with the pre-set ride height out of the box:

Front: ~ 310mm
Rear: ~ 320mm

These are design to make installation a bit easier.

Just check the springs pre-load to make sure they are all even and tight, then you are good to go.
And as usual, check everything over to make sure they are tight, and good to double check in a few weeks time to make sure nothing came loose.
Image
 
#50 ·
Just a note that the new suspension will come assemble with the pre-set ride height out of the box:

Front: ~ 310mm
Rear: ~ 320mm
Is that before or after the springs have settled?
 
#30 · (Edited by Moderator)
well after all that the drop links came off without a fight!! in fact, the whole back end was a walk in the park!
i just hope the fronts are as kind to me tomorrow.

the only problem i had today, was my stupidity, when i dropped 1 of the small nuts that go on the top of the shock, into the recess where the top mount comes through and it got stuck!!! and i couldnt get it out
Image
i'll have another bash tomorrow.

what setting do people run on the shocks? i wound them all the way down to 5 clicks, and it seemed ok. so i currently dont see the need for 30 point adjustment! but i'll have a pay once its all done
Image


As its not been mentioned, i can confirm that the back 2 meisterR shocks & springs save 3.1kg over standard!!!!!!! i will check the fronts tomorrow, and report back